Mask R-CNN

ช่วงนี้กำลังแกะรอย Mask R-CNN Architecture พอดีต้องพรีเซนต์งาน แต่ยัง งงๆกับโครงสร้างข้างในอยู่

https://www.slideshare.net/windmdk/mask-rcnn

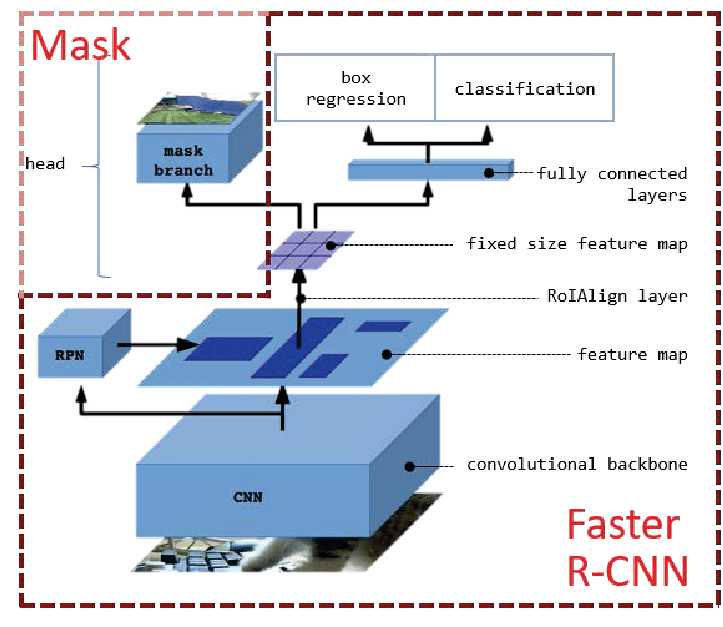
เริ่มจากรูปนี้ที่เห็นแพร่หลาย ซึ่งไม่ได้มาจากคนเขียนเปเปอร์ แต่มาจากคนที่ทำ slide รีวิวงานนี้อีกที รูปนี้ทำมาดูเข้าใจง่าย ก็คือ Mask R-CNN เป็น patch เสริม (เพิ่ม Segmentation) ของ Faster R-CNN (ที่ทำแค่ Object detection)

หลักๆแบ่งเป็น 4 ส่วน
1. CNN เอาไว้ extract features จากรูป input ได้เป็น feature map ออกมา
2. RPN เอาไว้ propose region ส่วนที่น่าจะเป็น object
3. RoIAlign เอาไว้ resize feature map (a region ที่อยู่ใน feature map) ให้มี size เท่ากันให้หมด (กำหนด size ล่วงหน้าไว้ในconfig)
เพราะการ train network เราจะ feed input ที่เป็น tensor (array หลายมิติ) เข้าไปขนาดมันเลยต้องแปลงให้เท่ากันจะได้ใส่ใน tensor ได้
4. Head : Classification / Object detection/ Mask prediction

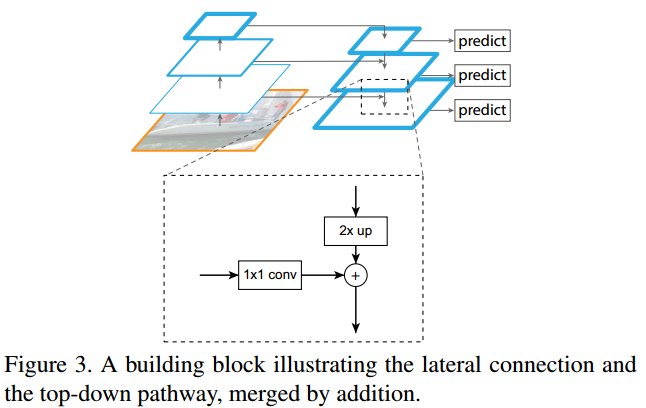
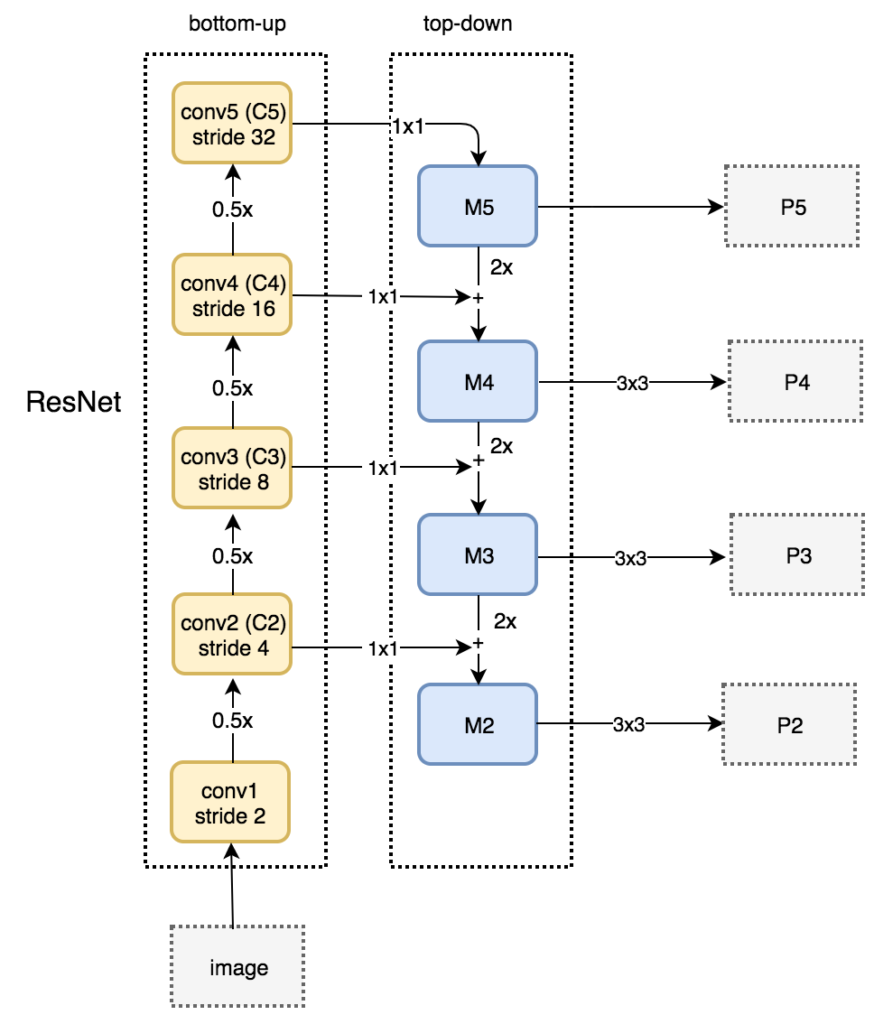
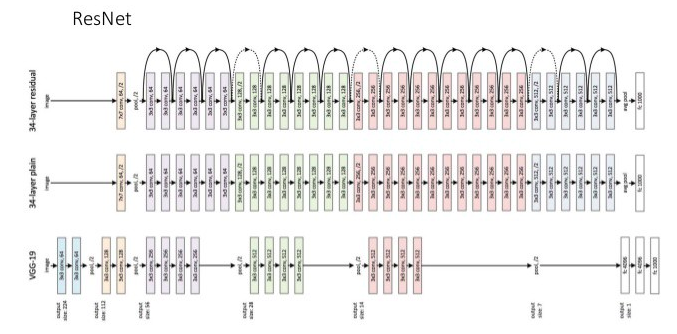
ในส่วนแรกที่เป็น Feature extraction เราจะเลือกโครงสร้างได้ 2 แบบคือ Conv network ธรรมดา จะใช้ VGG หรือ Resnet เป็น Backbone ก็ได้ กับอีกแบบคือ เสริม Feature Pyramid Network (FPN) เข้าไป ซึ่งจะช่วงให้ learn object เล็กๆได้

โค๊ด Mask R-CNN ต้นฉบับเป็นของ Facebook เขียนด้วย pytorch
แต่เรายังไม่เคยเขียน pytorch เลยเลือกใช้โค๊ดของ Matterport ที่เขียนด้วย keras
คิดว่า Architecture ข้างในของทั้ง 2 version คงไม่เหมือนกัน100%
ตัวที่ใช้อยู่นี้ backbone เป็น Resnet101 with FPN


เวลาเรียกฟังก์ชันสร้างโมเดล Mask R-CNN แล้ว เราสามารถ save model นั้นลงไฟล์

keras.models.save_model(model.keras_model,"mask_rcnn.hdf5")

เอาไฟล์ ไปเปิดในโปรแกรม Netron ก็จะเห็นโครงสร้างอันยาวเหยียด

หรือจะ plot model แล้ว save รูปดูก็ได้

#!conda install pydot -y 
#!conda install python-graphviz -y
from keras.utils import plot_model
plot_model(model, show_shapes=True, to_file='model.png')

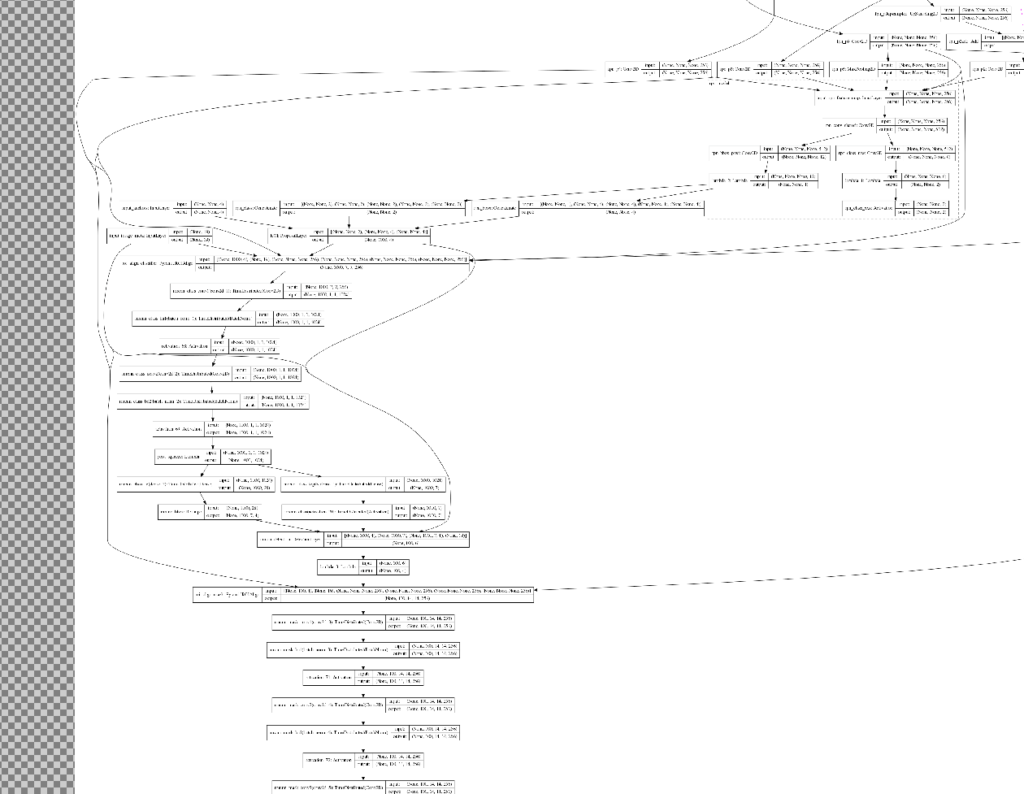
ก็จะได้กราฟยาวเหยียดคล้ายๆกัน
คือในส่วนหลังจาก Feature extraction แล้ว จะมีการเรียก class พวก ProposalLayer, PyramidROIAlign, DetectionLayer ทำให้กราฟที่ได้จาก Netron กับ plot_model() จะมีความแตกต่างกันนิดหน่อย

กราฟของ model นี้ ถ้าเริ่ม train model แล้ว ก็สามารถไปดูได้ใน tensorboard ได้เหมือนกัน

แล้วก็ ในไฟล์ inspect_model.ipynb จะมีตัวอย่างการใช้ฟังก์ชัน run_graph() ซึ่งช่วยให้เรารู้ขนาดของ output ตอนที่ออกมาจากแต่ละ layer ได้ + จะใช้ display_images() โชว์หน้าตาของ ouput ณ ตอนนั้น มาดูก็ได้

# Get activations of a few sample layers
activations = model.run_graph([image], [
    ("input_image_meta",        tf.identity(model.keras_model.get_layer("input_image_meta").output)), 
    ("rpn_bbox",           model.keras_model.get_layer("rpn_bbox").output),
    ("fpn_p6",     model.keras_model.get_layer("fpn_p6").output),
])
input_image_meta         shape: (1, 19)               min:    0.00000  max: 1024.00000  float32
rpn_bbox                 shape: (1, 261888, 4)        min:  -18.46270  max:   71.82899  float32
fpn_p6                   shape: (1, 16, 16, 256)      min:  -19.04598  max:   21.66270  float32
tp_layer = np.transpose(activations["fpn_p6"][0,:,:,:], [2, 0, 1]) #order
display_images(tp_layer, cols=64)
Feature map/Activation map ที่ออกมาจาก layer fpn_p6 ขนาด 16x16x256

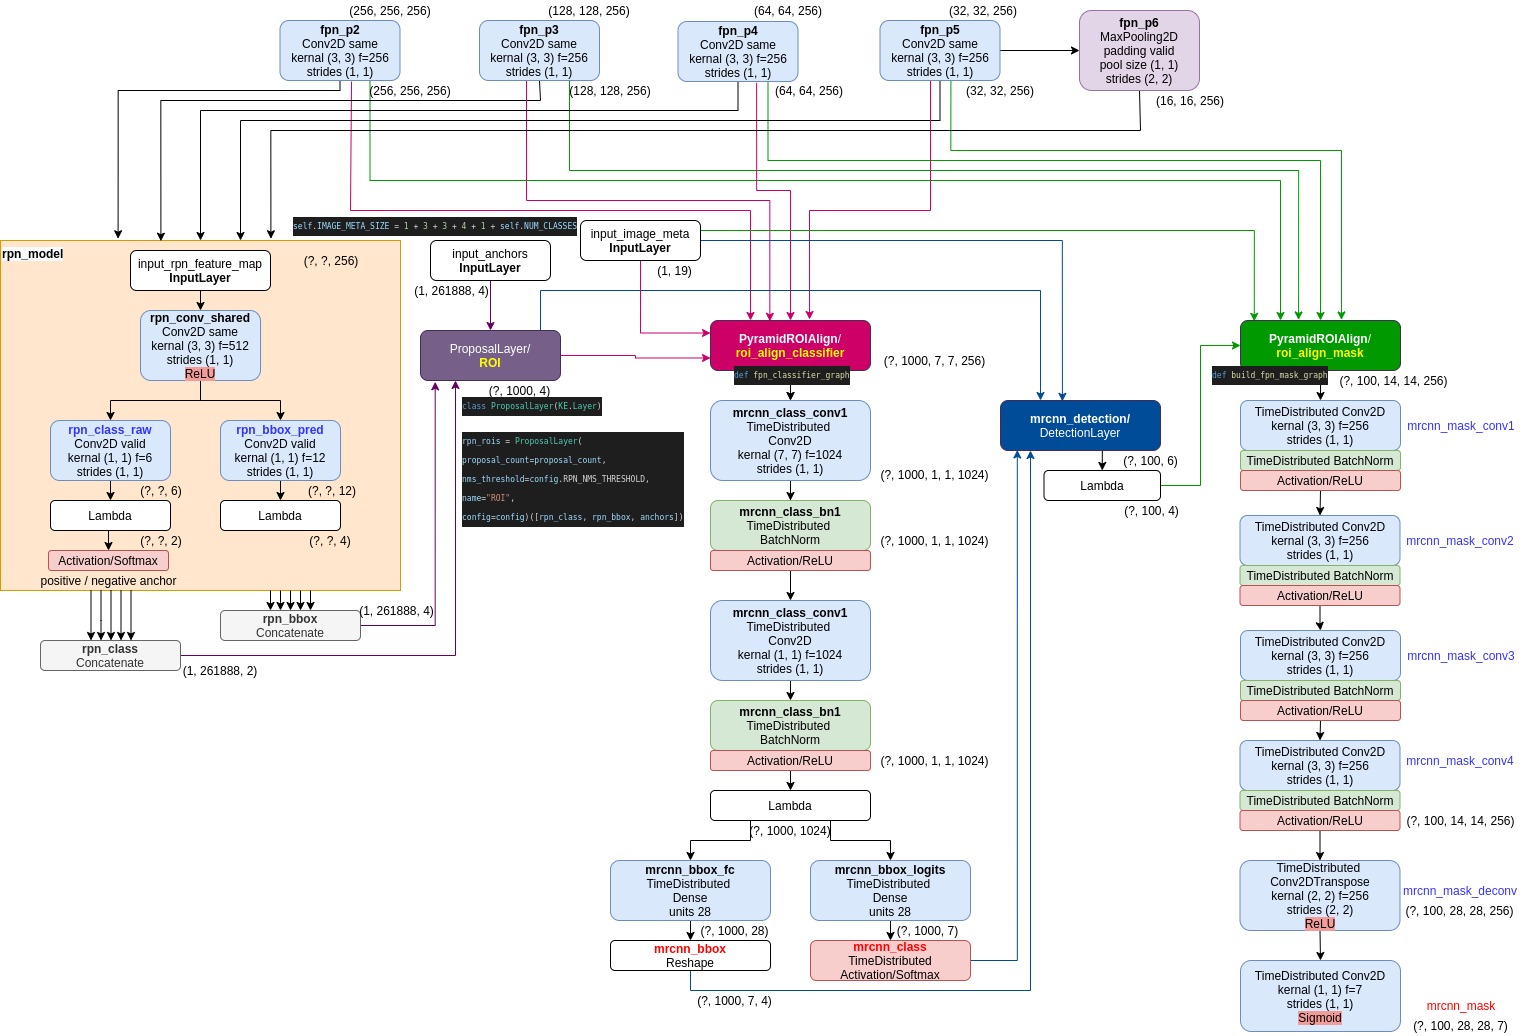
อย่างไรก็ตาม ก็ยังประติดประต่อ โครงสร้างของ Mask R-CNN ไม่ได้อยู่ดี เลยต้องเขียนแผนผัง layer ขึ้นมาเองอีกรอบ (ใช้โปรแกรม drawio)

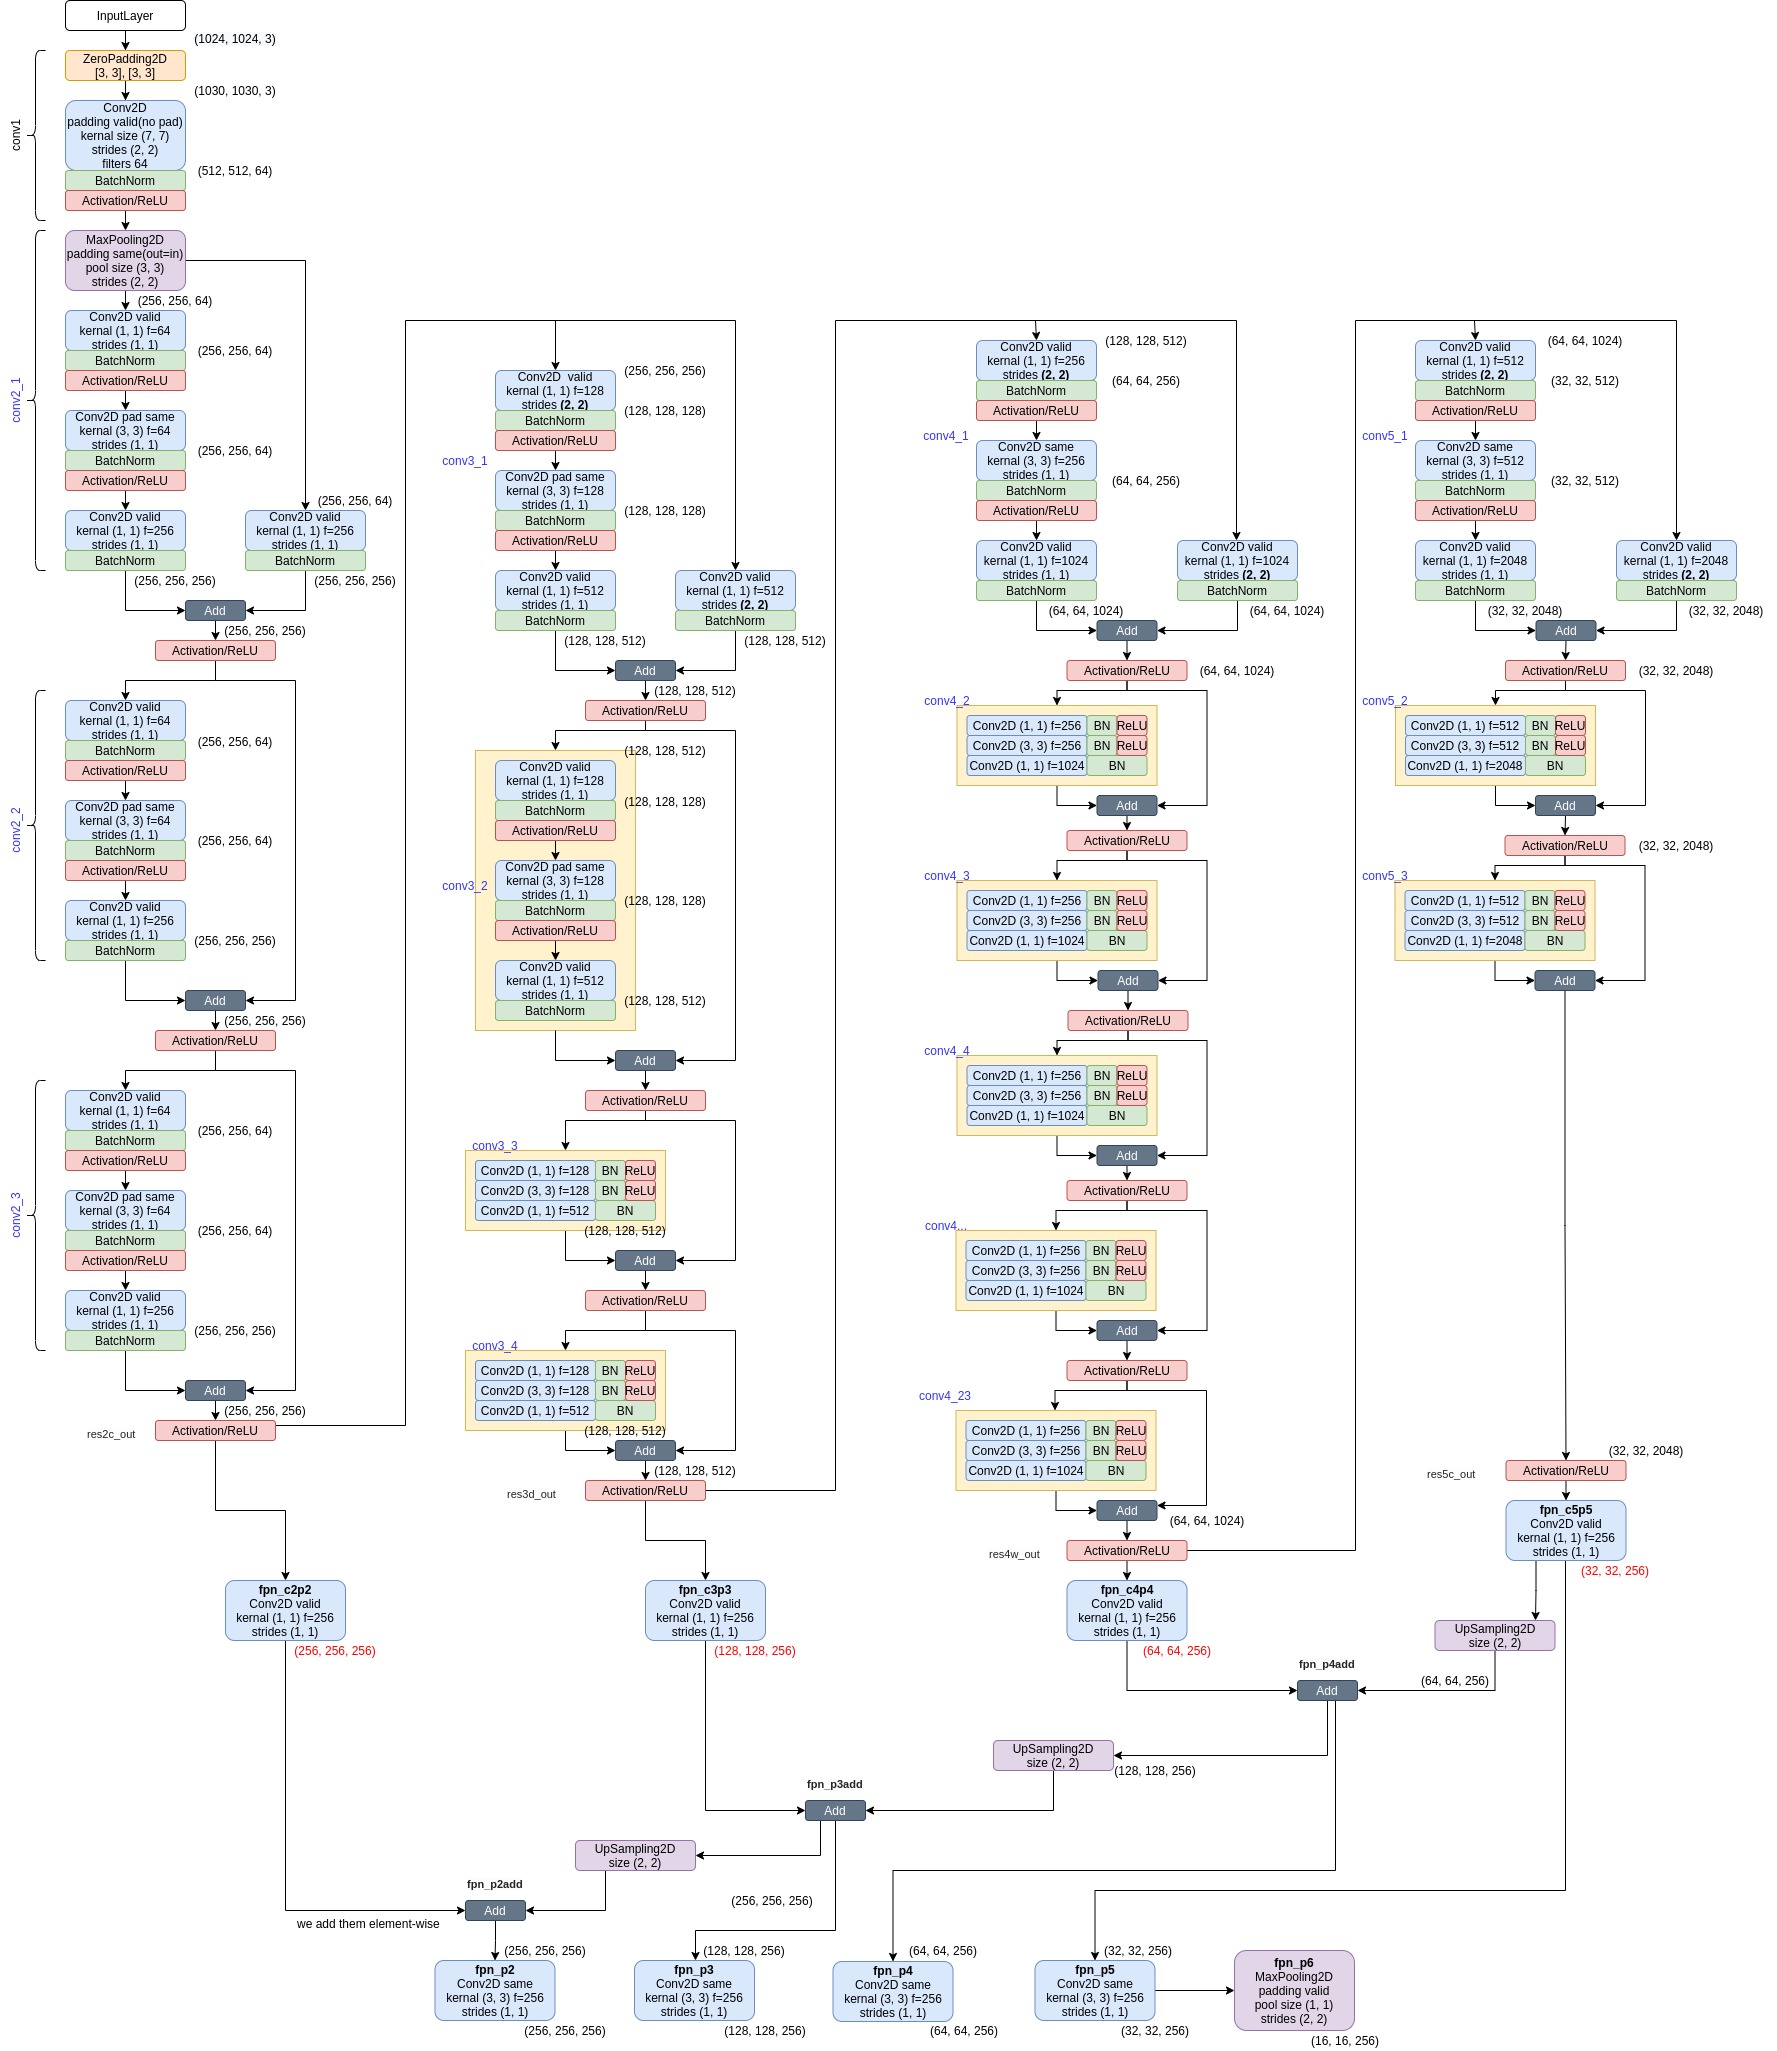
ภาพบนแสดง layers ในส่วน Feature extraction ที่เป็น Resnet101 + FPN
ภาพล่างแสดงส่วนที่เป็น RPN, ROIAlign, Classification, Object detection (box regression), Mask prediction

Install CUDA in ubuntu

We can install CUDA library (for using a GPU) by the following command.

sudo apt install nvidia-cuda-toolkit

however it will install the latest release (CUDA 11) which is not supported by many research projects in machine learning yet.

from: https://docs.nvidia.com/deploy/cuda-compatibility/index.html

To install a specific version of CUDA, check the linux driver version using the command “nvidia-smi”, if not satisfy you need to update the linux driver.
Then download CUDA .deb files from
https://developer.nvidia.com/CUDA-TOOLKIT-ARCHIVE

Installation Instructions:
wget https://developer.download.nvidia.com/compute/cuda/repos/ubuntu1804/x86_64/cuda-ubuntu1804.pin
sudo mv cuda-ubuntu1804.pin /etc/apt/preferences.d/cuda-repository-pin-600

wget http://developer.download.nvidia.com/compute/cuda/10.2/Prod/local_installers/cuda-repo-ubuntu1804-10-2-local-10.2.89-440.33.01_1.0-1_amd64.deb
sudo dpkg -i cuda-repo-ubuntu1804-10-2-local-10.2.89-440.33.01_1.0-1_amd64.deb
sudo apt-key add /var/cuda-repo-10-2-local-10.2.89-440.33.01/7fa2af80.pub
sudo apt-get update
sudo apt-get -y install cuda-10-2
sudo apt-get -y install cuda    <- need 1 hr++ to download the upgrade packages needed for installationsudo apt-get -y install cuda-10-2
$ wget http://developer.download.nvidia.com/compute/machinelearning/repos/ubuntu1804/x86_64/nvidia-machine-learning-repo-ubuntu1804_1.0.0-
1_amd64.deb
$ sudo apt install ./nvidia-machine-learning-repo-ubuntu1804_1.0.0-1_amd64.deb
$ sudo apt-get update

Then, link the current CUDA version to path environment

#maybe not important to do
export CUDA_HOME=/usr/local/cuda-10.2
export CUDA_ROOT=/usr/local/cuda-10.2
export PATH=$PATH:$CUDA_HOME/bin:$CUDA_HOME/include:$CUDA_HOME
export LD_LIBRARY_PATH=$CUDA_HOME/lib64:$LD_LIBRARY_PATH:$CUDA_HOME/include
export CUDA_INC_DIR=$CUDA_INC_DIR:$CUDA_HOME:$CUDA_HOME/include

#sudo dpkg -i cuda-repo-ubuntu1804_10.2.89-1_amd64.deb
sudo dpkg -i libcudnn8_8.0.3.33-1+cuda10.2_amd64.deb
sudo dpkg -i libcudnn8-dev_8.0.3.33-1+cuda10.2_amd64.deb
sudo dpkg -i libcudnn8-samples_8.0.3.33-1+cuda10.2_amd64.deb

Download cudnn ( a GPU-accelerated library for deep neuron networks) version that match the CUDA from
https://developer.nvidia.com/rdp/cudnn-archive

Check current version of CUDAcat /usr/local/cuda/version.txt
nvcc –version
Check cudnn versioncat /usr/include/x86_64-linux-gnu/cudnn_v*.h | grep CUDNN_MAJOR -A 2
cat /usr/include/cudnn.h | grep CUDNN_MAJOR -A 2
open bashrc file.gedit .bashrc
reload bashrc, after change it content.source ~/.bashrc
check symbolic link in the folderls -l /usr/local/
create symbolic linkln -s <source_file_directory> <link_file_directory>
print environment variableenv
env | grep -i cuda
rm filename
Useful commands

cat is use for print the detail inside a file.
.bashrc is a file that contains shell configurations and variable of the system.

dpkg is a tool to install, build, remove and manage Debian packages.
-i : install
-p : purge