ubuntu24 show thumbnail image

Just did what Claude said.

sudo apt install --reinstall bubblewrap

sudo tee /etc/apparmor.d/bwrap > /dev/null <<'EOF'
abi <abi/4.0>,
include <tunables/global>

profile bwrap /usr/bin/bwrap flags=(unconfined) {
  userns,

  include if exists <local/bwrap>
}
EOF

sudo apparmor_parser -r /etc/apparmor.d/bwrap

sudo aa-status | grep -i bwrap

Summary of what was wrong and what fixed it:

  • Ubuntu 24.04’s AppArmor hardening blocks unprivileged sandboxes (bwrap) by default, but the bubblewrap package ships no profile to exempt itself — so Nautilus’s sandboxed thumbnailer silently failed and cached that failure permanently.
  • Adding /etc/apparmor.d/bwrap with a userns allow-rule (loaded via apparmor_parser -r) let bwrap work again.
  • Clearing ~/.cache/thumbnails/fail and reopening the folder let Nautilus regenerate thumbnails successfully.

ubuntu passwd reset

เรื่องวุ่นๆ เกิดจากเราไปเอาคอมเก่าปี 2018 มาใช้ ละวันนี้ อยู่ดีๆมันก็ shutdown ตัวเอง ปัญหาเกิดจาก cpu ไม่ระบายความร้อน อุณหภูมิขึ้นไป 98องศาก่อนเครื่องจะดับ (พึ่งเปิดได้แปปเดียว)

ก็เลยต้องหาคอมใหม่มาแทน ละอาจารย์matsuokaที่เกษียณออกไป แกทิ้ง minipc ไว้หลายเครื่องมาก clean ubutu ละด้วย แต่ไม่รู้ password

ส่วนตัวมี usb install 22.04 จะลงใหม่ดีมั้ย …. แต่พอดีว่าเป็น ubuntu 24.04 ไหนๆก็ไหนๆ อยากลองใช้ดูหน่อย ละน้องในแลปบอกว่า มันมีวิธีreset password อยู่ ส่งlink chatgpt ภาษาญี่ปุ่นมาให้ คือเข้าไปทำใน recovery mode

เราก็เลยไปถาม claude ต่อ ขั้นตอนคือเราต้อง boot เข้าหน้า grub menu ให้ได้ก่อน กด shift/esc

แต่ทำยังไงก็ไม่มี grub menu โผล่มา ได้ไปอยู่ใน grub> แทน

ลืมอ่าน Some manufacturers use F2, F8, F10, F12, or Del during POST to get a boot menu — that’s different from GRUB, but from there you can sometimes select a “Recovery” option

set root=(hd0,gpt1)
linux (hd0,gpt1)/boot/vmlinuz-XXX root=/dev/sda1 init=/bin/bash
boot

พิมพ์คำสั่งนี้ไป ละ

kernel panic

please reboot you computer

vfs:unable to mount root fs on unknown-block(0,0)

ปัญหาคือคอมเครื่องนี้ไม่ได้ใช้ sda มันใช้ nvme ต่างหากก งุงิ น่าชะเช็คก่อนตอน อยู่ใน ubuntu

set root=(hd0,gpt1)
linux (hd0,gpt1)/boot/vmlinuz-XXX root=/dev/sda1 init=/bin/bash
initrd (hd0,gpt1)/boot/initrd.img-XXX
boot

เลยมาพิมพ์อันนี้

พอ boot ละ ก็เข้ามาอยู่ในจอ (initramfs)

mkdir -p /mnt/root
mount /dev/nvme0n1p1 /mnt/root
ls /mnt/root

What to look for: if you see bin, boot, etc, home, usr, var, etc. — that’s your root partition, proceed to the chroot step below.

chroot /mnt/root /bin/bash

เจอ

bash: cannot set terminal process group (-1): inappropriate ioctl for device

bash: no job control in this shell

บอกว่าเป็น harmless warning เลย เปลี่ยน passwd ต่อเลย

passwd username
exit
reboot -f

สำเร็จเรียบร้อย แต่จริงๆ ติดนู่นนี่เยอะอยู่ ใช้เวลาไปชั่วโมงนึง กว่าจะทำได้

never settle android app

So I have to come back to work on the robot measuring project…in which I had to switched to the floorplan project last week…

These days, I somehow annoyed about the 5G signal measuring phone…so that I cannot move on the robot part. and the meeting deadline is upcoming….

Now I have 5 version of the apps (powered by Claude).

  • v1: the one that company developed, and I added the cellID
  • v2: the one where I found that the GPS was not accurate in real time, so I fixed it. I also appended more information by mimicking the GNetTrack app (PCI, TAC, eNB, MCC, MNC, EARFCN, band, bandwidth, timing advance, level; GPS altitude/accuracy/speed/bearing). There is also a neighborCells report. I just found out that there are also neighbor cells signal…..
  • v3: somehow change the code/format/layout tried to split 5G NR out from the 4G LTE.
  • I found out how the company gets the signal data, and I don’t really like the approach. They aggregate data from three sources: 1) servingSignal callback, 2) cached TelephonyManager.signalStrength, and 3) CellInfo.cellSignalStrength, and then take whichever one is the most recent. But when I look at each source individually, they don’t show a similar trend at all. They are different metrics! Why don’t they check and understand the data first before merging them into the same group? I’m quite upset after finding this out.
  • But later try to find the best way to get the accurate signal value…I found that there are 5 ways (or more) to get the signal data (push or poll) on different android API version….the name are similar, and it make me hard to make a decision…so I leave it to the Claude…. (this recall me on my past android app dev, just the newer API, the worked calendar function doesn’t work anymore….)
  • v4: still working on how to get the 5G NR data, also add the carrier aggregate info, and base station estimation map so that I would know which direction I should walk to accurately locate the BS position.
  • v5: make the data update 1 Hz as possible. remove the base station map as get more data and calculate offline is better. also the CA never shown (while reported in GNetTrack or NetworkSignalGURU), also add batteryPercent to track in case that I leave the smartphone several days.

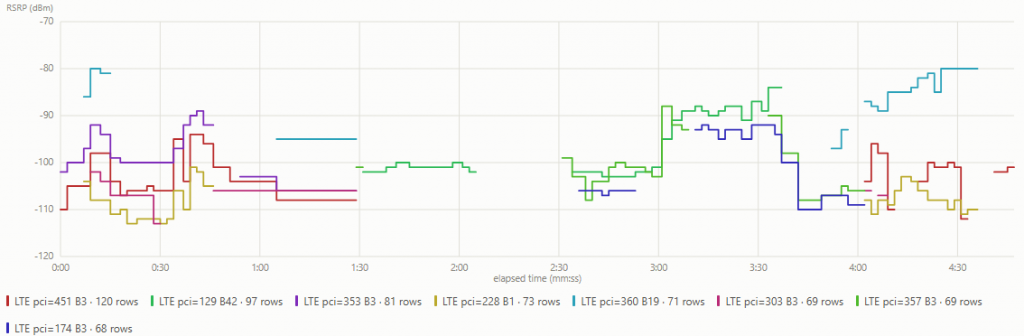
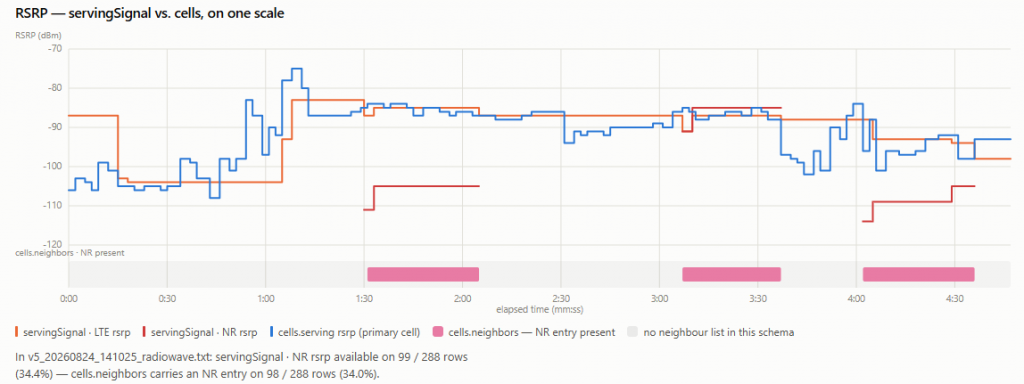
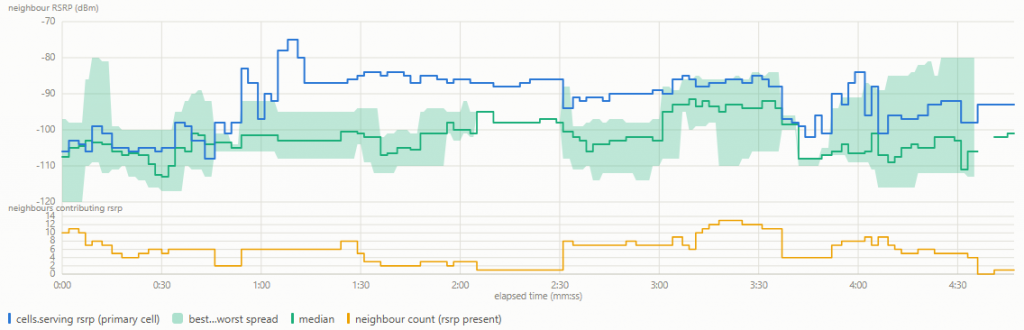
So, I gonna conclude that the data from serving? SignalStrenght (the orange) is less update,the one from CellInfo (blue) changes a lot (though flucturate…), and the NR data (red) is rare…just 30%

Then, look in to the Cell info neighbor cells (green) compare to the primary cell (blue), yeeah… the primary cell signal is stronger than the average neighbor cell…

Here is a plot of all neighbor cell, so fluctuate….

workaholic

I can’t remember my WordPress pw, not sure when did I change the pw… btw, I often can’t remember anything recently, maybe due to my brain being overloaded. After I got locked out due to the login timeout, I reset my pw to the usual one… although it’s a weak pw…

Then, many things I wanna say… regarding work…
as I want to settle what I’m thinking, what I’ve done.

Part of my work; the radio signal measurement robot system with digital twin connection (as a database? realtime viz, offline viz, anything…)

With the coming of AI, Claude helps me a lot with programming/data debugging/visualizing. But I also need time to review the results and make decisions, which somehow exhausts me… due to too much information….

1. signal measuring smartphone app:
which was originally developed by a company, but later modified many times. let me complain about them… there is a first month for customer requirement gathering; during that time, I had decided everything in the order document (as my boss told me to do), then I just asked them whether there was anything else I could measure other than RSRP, RSRQ, SNR stuffs (as I just got a comment from the collaborative research company), then the guy just said, “I don’t know, it needs to be researched.” But since I didn’t ask them to find that information, they didn’t do it… yeah, I didn’t ask them to do that. but I paid you the money. well they did not get more salary, btw, they get one more job to do for the foreigner like me.

more things to say…. but I should not write them, better to forget… I don’t know why I’m often unhappy when I order a company to develop a system. maybe because I can do it… cheaper than them… also, I often have ideas to improve the system that come along seeing the progress, after placing the order requirement…

So, for the app, I added the Cell ID later (with AI power),
then I found out that the GPS is not accurate, the position is jumping, and with AI power, I found that there are many ways to get GPS info. The one that the company used updates every 6 seconds… but I required 1 second. Since I didn’t add a requirement to check the accuracy of the GPS, so they didn’t check the value? The reason is there is a battery saver function, so the GPS doesn’t update in realtime. Then I asked AI to fix the GPS to realtime.

Also, I need to get the band number. I later found the G-NetTrack app (which I had touched before, but if I had thought of it before placing the order, I would have let the company dev this part). There are many signal-related metrics which I don’t know much about, as I’m not in the field. I asked Claude to mimic the G-NetTrack app, and got a new version of the measuring app that measure a lot.

Then I want to get both 4G and 5G signals together with the base station and band information… but it seems there are 4 ways to call the Android API, each giving different metrics with different callback timers….. and I have a problem merging the data right now…

2. robot:
the ROS1 version works fine… with some collisions indoors. So I need to set many waypoints rather have a rough number. It is difficult to balance between letting the robot move through a narrow path between tables and not making a collision when rotating… there are 20+ parameters to adjust…

another company I contacted to solve this problem, I saw him adjusting the parameters for hours, but there were still some navigation failures.

I upgraded the robot to ROS2 with the hope that the navigation would be more clever… through the upgrade… with full Claude power… as I have no ROS2 knowledge… a lot of things to make a decision about… so exhausting…. and not done yet…

3. robot path planning:
just making it able to run with the robot in simulation is so difficult. a program that a PhD candidate student developed in Python, with a simple map with obstacle coordinates… I had to turn it into an application in ROS… I regret not asking the company to do this part, as at that time I didn’t know how to ask them to do it. and I knew that the algorithm was not settled yet, so I decided to do it on my own.

Not really, I wrote a requirement in the first draft of the order, but the quoted price was too high, so I cut this part out along with other parts in the second draft of the order, but still got the same price even after cutting out the functionality….

By the way, I made it work in ROS1 simulation, now I need to make it run in realtime in ROS2…. so overwhelmed.

4. the digital twin platform:
something that I have to invent as a novel work… which is just a realtime database with MongoDB… which is not really essential…. but costs 3.5 million yen… and I didn’t want to waste the money…. so I need to somehow make it more usable….
map2gazebo

1. The github source code has many points to be fixed,
update map2gazebo/src/map2gazebo.py by following:
http://mionzwp.bumbleplay.com/ros/03-ros-generate-world-from-scan-map/

2. Edit the map (crop/rotate/add walls/add unknown area)
convert map.pgm map.png
edit map.png using any photo edit tool (photopea.com)
convert map.png map.pgm

3. Edit map.yaml file to set the robot origin
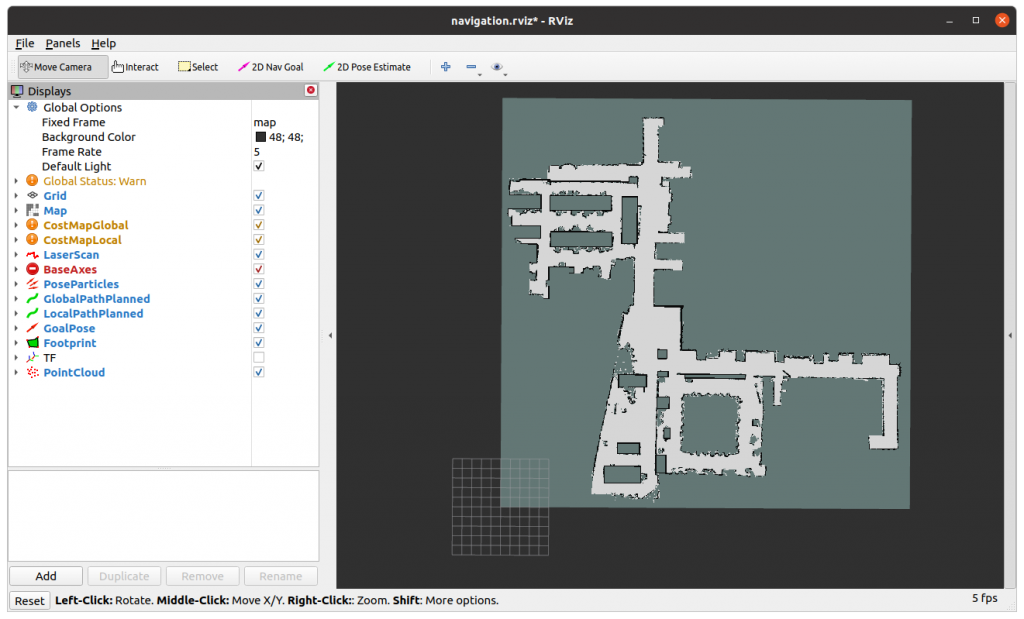
first set origin: [0.0, 0.0, 0.0], the bottom left of the map will be set to center in the rviz.
One grid equal to 1 metre.
Run rosrun rviz rviz -d navigation.rviz to open rviz.
Run rosrun map_server map_server cmc7f_202504.yaml to load map.
Update yaml file, Assign x = -5.0 will move map to the left, y= -5.0 will move map down.
The center of 10×10 grid is the position where the robot spawn.
Save yaml file, and load the map again to update origin position in rviz

4. Run map_server to load map
rosrun map_server map_server cmc7f_202504.yaml
[ INFO] [1766297469.674219814]: Loading map from image “cmc7f_202504.pgm”
[ INFO] [1766297469.679488601]: Read a 850 X 850 map @ 0.050 m/cell

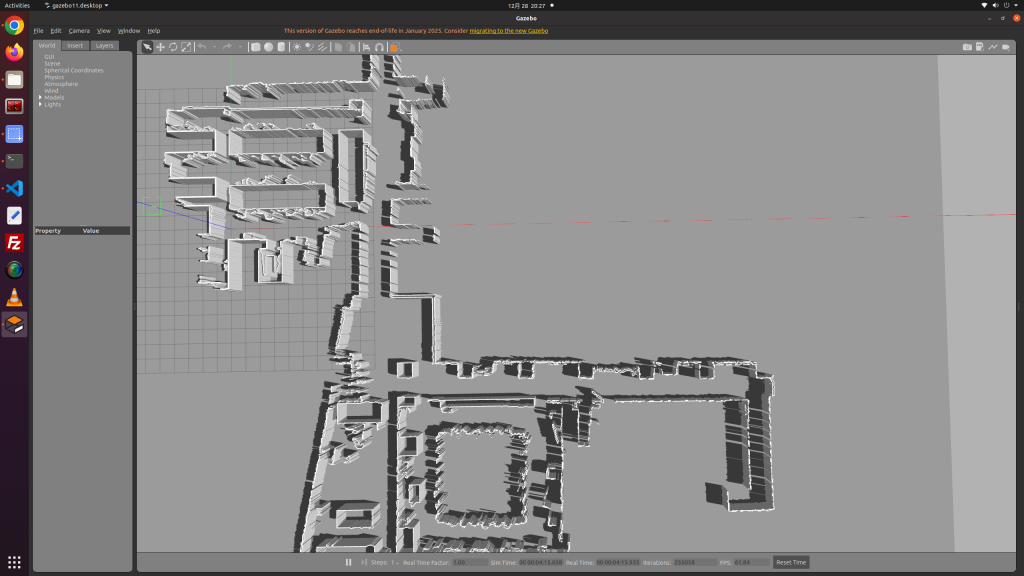
5. Run map2gazebo.launch to create a model from rosmap
roslaunch map2gazebo map2gazebo.launch params_file:=$(rospack find map2gazebo)/config/defaults.yaml
[INFO] [1766297467.412934]: map2gazebo running
[INFO] [1766297469.685248]: Received map
[INFO] [1766297481.411006]: Exported STL. You can shut down this node now

6. Run gazebo_world.launch, then File -> Save World As -> map_7f.world
roslaunch map2gazebo gazebo_world.launch

7. Copy .world file and folder ~/catkin_ws/src/map2gazebo/models to destination

8. Create a launch file that read load the model folder and .world file

Posted in ros

catkin_make vs catkin build

นั่งอ่านมาหลายรอบ จดโน๊ตไว้ทุกครั้ง แต่จดไว้ที่ไหนก็นึกไม่ออก มีทั้งสมุดทั้งเว็บทั้งโปรแกรม พอจะสร้าง packageใหม่ ก็งง ทำไงดี จำวิธีไม่ได้ ละก็ยังใช้ ros1อยู่ค่ะ…ไม่ได้ไปไหนสักที

ระบบ build/compile code ของ ros1 เอาไว้ใช้กับ .cpp ถ้าเป็นไฟล์ python มาก็เอาใส่โฟลเดอร์ ละเรียกใช้ได้เลย แต่ต้อ set permission chmod 777 ก่อน จำได้ว่า 775 ก็พอละ แต่เลขมันจำยาก.. ยก all permission ให้ไปเลย

catkin_make เป็น default build command ใน ros groovy (2012) และก็ยังใช้มาเรื่อยๆ เค้าบอกว่าข้อเสียของอันนี้คือ มันbuild โฟลเดอร์ src ทั้งก้อน เลือก build เฉพาะ package ไม่ได้ ซึ่งก็ไม่จริงเพราะใช้ คำสั่ง catkin_make –pkg <pkg_name> ได้

ตัว catkin_make เนี่ย จะไปหา package.xml ตามโฟลเดอร์แต่ละอัน แล้วทำ build dependency ขึ้นมา ซึ่งเราสามารถ install missing dependencies ได้จากคำสั่งข้างล่าง

rosdep update

rosdep -y install –from-paths src –ignore-src

ตอนสร้าง package ใหม่ ให้ใช้คำสั่ง
catkin_create_pkg <pkg_name> rospy std_msgs tf2_ros

cd ~/catkin_ws/src
catkin_create_pkg my_package actionlib geometry_msgs move_base_msgs nav_msgs rospy std_msgs tf2_ros

อย่างสร้างโฟลเดอร์เอง เพราะมันจะไม่มี package.xml กับ CMakeLists.txt
แต่พวก dependencies เนี่ยสิ ตอนแรกจะไปรู้มั้ยว่าจะใช้อะไร คงต้องมานั่งเขียนใส่ใน package.xml กับ CMakeLists.txt เองทีหลังสินะ…

catkin build ที่มาช่วยให้ build แยก package ได้ เป็นคำสั่งใน catkin_tools มาช่วง ros indigo (2014) และเป็นที่นิยม เห็นว่า build เร็วขึ้น มีฟีเจอร์อื่นๆให้ใช้ แต่ใช้ไม่เป็น

sudo apt-get install ros-noetic-catkin python3-catkin-tools

catkin build <pkg_name>

catkin build – build packages
catkin clean – clean build products
catkin config – configure workspace settings and layout
catkin create – create packages
catkin env – run commands with a modified environment
catkin init – initialise a workspace
catkin list – list package information
catkin locate – get workspace directory paths
catkin profile – manage named configuration profiles
catkin test – test packages

จำได้ว่าถ้าใช้ catkin build แล้ว จะกลับไปใช้ catkin_make ไม่ได้ละนะ..

Posted in ros

Megarover-Unity association

Robot

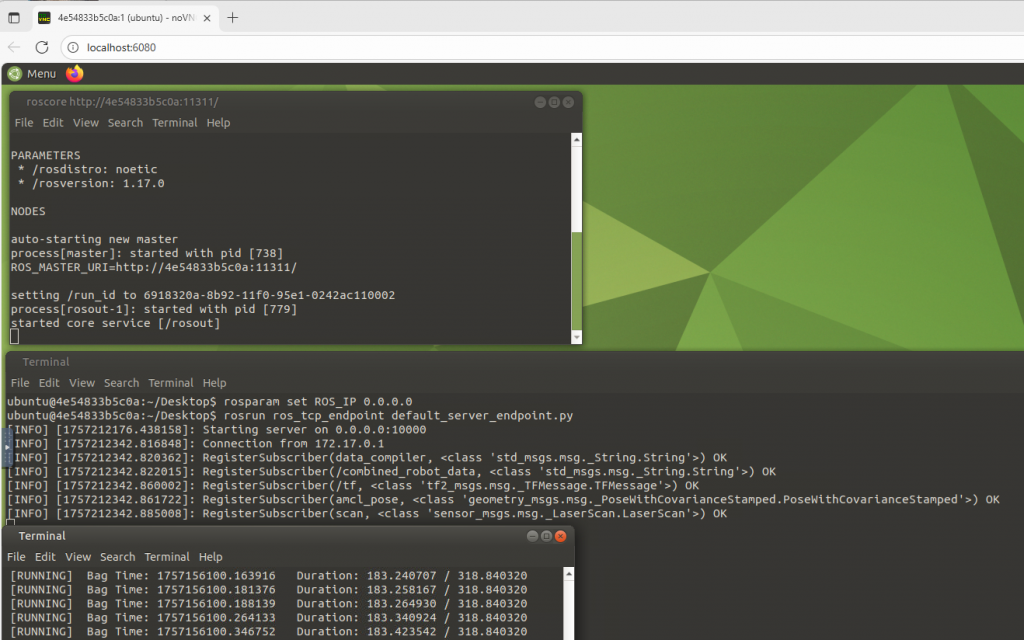
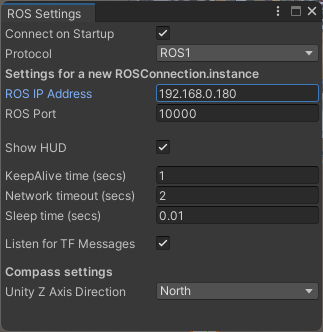
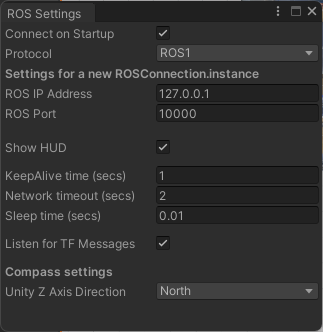
  • rosparam set ROS_IP <ros pc ip>
  • rosrun ros_tcp_endpoint default_server_endpoint.py
  • rosbag play room_record.bag –loop

plan to run the rosbag in docker: tiryoh/ros-desktop-vnc:noetic 10000:10000 6080:80
the docker directory is link to pc at C:\Users\dellg15\ros1_ws

Some ROS hint when fail to build or run

  • source /opt/ros/noetic/setup.sh
  • rosdep update
  • rosdep install –from-paths src –ignore-src -r -y
  • catkin_make –pkg <pkg name>
  • rm -rf build/ devel/
  • dos2unix <filename.py>
  • chmod +x filename
  • convert xx.pgm xx.png

Unity

Windows > Package Manager > + Add pakage from git url
https://github.com/Unity-Technologies/ROS-TCP-Connector.git?path=/com.unity.robotics.ros-tcp-connector#v0.7.0

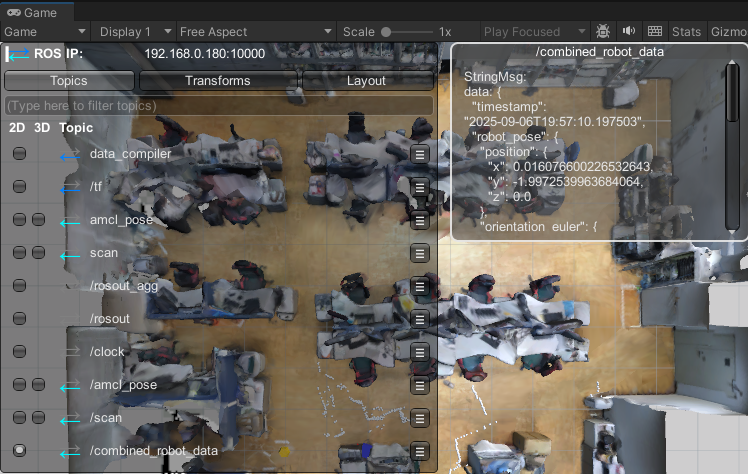
topic send from robot
topic send from docker
Posted in ros

wanna eat

why I feel want to eat something while I read a difficult article

ChatGPT said:

That’s actually a pretty common brain–body response, and it comes down to how your mind handles effort and stress.

When you read something difficult, your brain shifts into high cognitive load mode — working memory, attention, and problem-solving all spike in activity. This can trigger a few things:

  1. Energy demand signal – Your brain runs almost entirely on glucose, and although reading doesn’t burn a huge amount of calories, sustained mental effort feels like an energy drain. Your body interprets that as a cue to refuel, making snacks suddenly sound appealing.
  2. Stress coping – Challenging reading can activate a mild stress response. Many people unconsciously use eating (especially sweet or crunchy snacks) as a comfort or grounding mechanism.
  3. Reward-seeking loop – Struggling with a hard text can feel frustrating. Eating activates your brain’s dopamine reward system, which can momentarily offset that discomfort — so your brain learns: “This is tough… snack time!”
  4. Habit association – If you’ve often eaten while studying or reading in the past, the mental strain might automatically trigger that old habit, even if you’re not physically hungry.

If you want to test whether it’s actual hunger or just a mental coping cue, you can try pausing for a moment and drinking water, stretching, or doing a 2-minute unrelated task before reaching for food — if the craving fades, it was likely brain-stress, not fuel need.

Here’s a compact 2-minute “in-flow craving reset” you can do without leaving your seat:


Minute 0–0:30 — Hydrate & Acknowledge

  • Take a few slow sips of water or tea.
  • Mentally note: “I’m not truly hungry; this is just a brain craving.”

Minute 0:30–1:30 — Micro-movement & sensory shift

  • Roll shoulders, stretch neck, wiggle fingers.
  • Adjust lighting or glance outside for a quick visual reset.

Minute 1:30–2:00 — Mini reward

  • Chew sugar-free gum or take two deep breaths.
  • Give your brain a tiny “reward” without food.

Kringing Algorithm

I’m working with this recently. It was use to interpolate the unmeasured data in environment. I asked chatgpt to explain the algorithm for me.

How are the weights chosen?
Kriging looks at
Distance: closer points are more relevant
Spatial correlation: how similar nearby points tend to be (modeled by a variogram)

The variogram describes how values “change” with distance. For example:
If points 1 meter apart are almost always similar → strong correlation
If points quickly become unrelated as you move away → weak correlation

from pykrige.ok import OrdinaryKriging
OK = OrdinaryKriging(
    x, y, values,
    variogram_model='gaussian',
    variogram_parameters=None,
    nlags=6,
    weight=True,
    enable_plotting=False,
    coordinates_type='euclidean'
)
z, ss = OK.execute('grid', gridx, gridy)
z[z < 0] = np.nan   # post-process results by masking negatives

variogram_model: controls how spatial correlation decays including linear, power, gaussian(default), spherical, exponential
variogram_parameters = {‘sill’: 0.8, ‘range’: 10, ‘nugget’: 0.1}
nlags: controls how many lag bins are used to calculate the experimental variogram. More bins is more smoother fitting, but slower.
If weight is True, It weight the variogram fitting by number of point pairs per lag.
coordinates_type
-euclidean: x, y in linear units (e.g., meters)
-geographic: lat/lon in degrees

Execute option: grid for mesh, points for specific locations

#If you want even more control (e.g., kernels, noise, trend), use GaussianProcessRegressor:

from sklearn.gaussian_process import GaussianProcessRegressor
from sklearn.gaussian_process.kernels import RBF, WhiteKernel, ConstantKernel

kernel = ConstantKernel() * RBF(length_scale=10.0) + WhiteKernel(noise_level=0.1)
gpr = GaussianProcessRegressor(kernel=kernel)