ใน ubuntu จะมีโปรแกรมชื่อ systemd เป็น service manager
ไฟล์ abc.service ต่างๆ จะอยู่ใน /etc/systemd/system เพื่อให้ service นั้นๆ run ตอนที่คอมเปิดเครื่อง/รีสตาร์ท
ไฟล์ .service ที่เราเขียนเอง จะถูกเก็บไว้เป็น symbolic link ของpathจริง ใน /etc/systemd/system
[Unit]
Description=remote shutdown service

[Service]
ExecStart=/bin/bash -c "python -m uvicorn shutdown_api:app --host 0.0.0.0 --port 7999 --reload"
Restart=always
Type=simple
WorkingDirectory=/mnt/shutdown_api/
RestartSec=10
StandardOutput=syslog
StandardError=syslog

[Install]
WantedBy=multi-user.target
จริงๆแล้ว ใช้ ExecStart=/bin/bash -c “python3.8 /mnt/shutdown_api/shutdown_api.py” ก็น่าจะได้ แต่เซิฟเวอร์ที่ใช้อยู่เป็นอะไรไม่รู้รันคำสั่งธรรมดาไม่ได้ เลยต้องพิมพ์แบบยาวๆ
import uvicorn
from fastapi import FastAPI
import subprocess

app = FastAPI()

@app.get("/")
def shutdown():
    #subprocess.run([f"shutdown -h now"], shell=True)
    password = "serverpassword"
    command = f"echo {password} | sudo -S shutdown -h now"
    print(command)
    subprocess.run(command, shell=True, stdout=subprocess.PIPE, stderr=subprocess.PIPE)

if __name__ == "__main__":
    uvicorn.run(app, host="0.0.0.0", port=7999, reload=True)
ไฟล์ python นี้คือ ให้ uvicorn server รัน FastAPI application (app)
ส่วน app = FastAPI() ก็จะเรียก def shutdown() ถ้ามี HTTP GET command ถูกเรียกใข้งาน
จากการที่เรา พิมพ์ curl http://192.168.11.122:7999 ใน terminal
ปล. host=”0.0.0.0″ means that the server will listen on all available network interfaces on the host machine. This makes the server accessible from any IP address on the network.
วิธีติดตั้ง service
1. sudo systemctl daemon-reload
#to reload the systemd manager configuration
2. sudo systemctl enable shutdown.service
#to enable the service to start at boot (create symbolic link if not exist)
3. sudo systemctl start shutdown.service
#to start the service
4. sudo systemctl status shutdown.service
#to check the status of the service
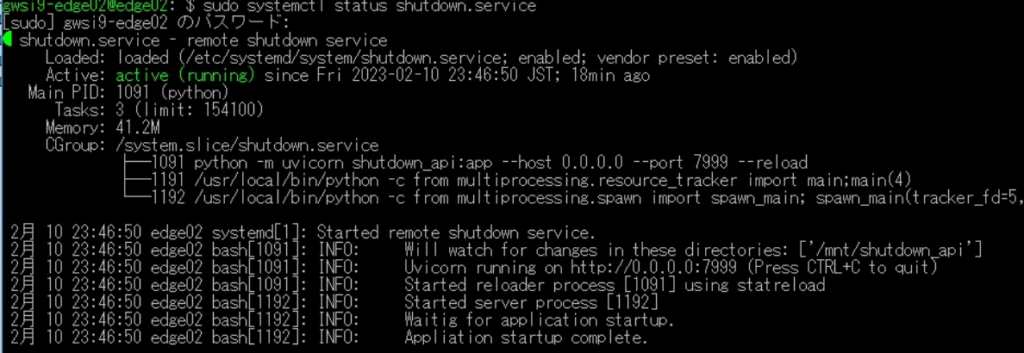
ถ้า host=0.0.0.0 ตามที่เขียนไว้ใน python file คือ ok
แต่ถ้าเป็น host=127.0.0.1 คือเป็น loopback จะไม่สามารถเรียก http get จาก คอมเครื่องอื่นในเน็ตเวิคได้
5. netstat -an|more #to check all available services
ปล. เขียนแยกหลายๆ decorator ก็เหมือนจะได้นะ
@app.get(“/shutdown”)
async def shutdown():
@app.get(“/restart”)
async def restart():
ส่วน HTTP POST ดูใช้งานยากอยู่ ยังไม่เคยลอง แต่ประมาณนี้
@app.post(“/items/”)
async def create_item(item: Item):
curl --header "Content-Type: application/json" \
     --request POST \
     --data '{"name": "example item", "price": 9.99}' \
     http://localhost:8000/items/
ตรง –data คือ ส่ง json structure เข้าไปเป็น input ที่ฟังก์ชัน